Artwork

A tartalmat a 5 THINGS - Simplifying Film, TV, and Media Technology, 5 THINGS - Simplifying Film, TV, and Media Technology biztosítja. Az összes podcast-tartalmat, beleértve az epizódokat, grafikákat és podcast-leírásokat, közvetlenül a 5 THINGS - Simplifying Film, TV, and Media Technology, 5 THINGS - Simplifying Film, TV, and Media Technology vagy a podcast platform partnere tölti fel és biztosítja. Ha úgy gondolja, hogy valaki az Ön engedélye nélkül használja fel a szerzői joggal védett művét, kövesse az itt leírt folyamatot https://hu.player.fm/legal.
Player FM - Podcast alkalmazás
Lépjen offline állapotba az Player FM alkalmazással!

Transcoding in Post Production

16:22
 
Megosztás
 

Manage episode 309677220 series 3037997
A tartalmat a 5 THINGS - Simplifying Film, TV, and Media Technology, 5 THINGS - Simplifying Film, TV, and Media Technology biztosítja. Az összes podcast-tartalmat, beleértve az epizódokat, grafikákat és podcast-leírásokat, közvetlenül a 5 THINGS - Simplifying Film, TV, and Media Technology, 5 THINGS - Simplifying Film, TV, and Media Technology vagy a podcast platform partnere tölti fel és biztosítja. Ha úgy gondolja, hogy valaki az Ön engedélye nélkül használja fel a szerzői joggal védett művét, kövesse az itt leírt folyamatot https://hu.player.fm/legal.

1. Onset and Editorial Transcoding

When does Post actually begin?

Since we’ve moved from celluloid to digital, the answer to this query has quickly moved to production. In fact, over the past 20 years, a new position has emerged – the DIT, or Digital Imaging Technician, as a direct response to the need to coordinate between digital acquisition and subsequent post-production. In fact, the DIT is such an instrumental part of the process, that the DIT is often the liaison that connects production and post together.

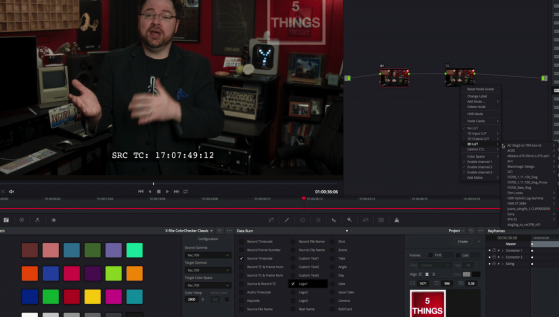
Common onset and post transcoding: Blackmagic Resolve, adding a timecode window burn, a watermark, and a LUT.

Adding a watermark, timecode window burn, and LUT inside Blackmagic Resolve

Now, this can vary depending on the size of the production, but the DIT will not only wrangle the metadata and media from the shoot and organize it for post, but they may have added responsibility. This can include syncing 2nd system audio to the camera masters. This may also include adding watermarks to versions for security during the dailies process or putting a LUT on the camera footage. Lastly, the DIT may also create edit ready versions – either high or low res – depending on your workflow. A very common tool is Blackmagic Resolve, but also tools like Editready, Cortex Dailies, or even your NLE.

Now, having the DIT do all of this isn’t a hard and fast rule, as often assistant editors will need to create these after the raw location media gets delivered to post. What will your production do? Often, this comes down to budget. Lower budget? This usually means that the assistants in post are doing a majority of this rather than the folk’s onset.

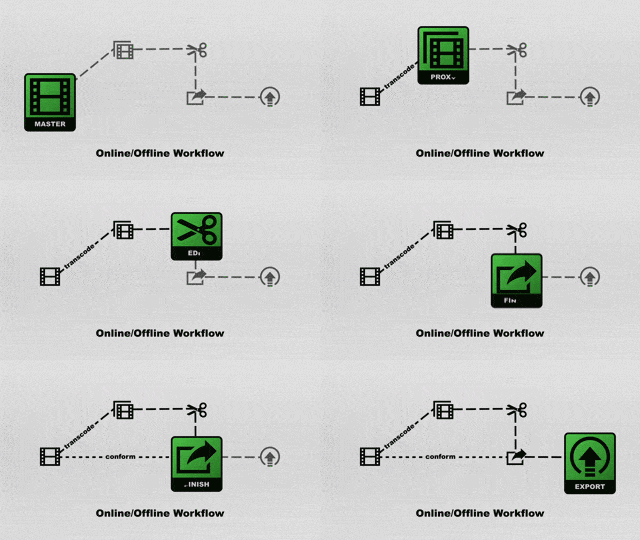
As for the creation of edit-ready media, this speaks to the workflow your project will utilize. Are you creating low res offline versions for editorial, and then reconforming to the camera originals during your online?

An animated traditional offline/online workflow

A traditional offline/online workflow

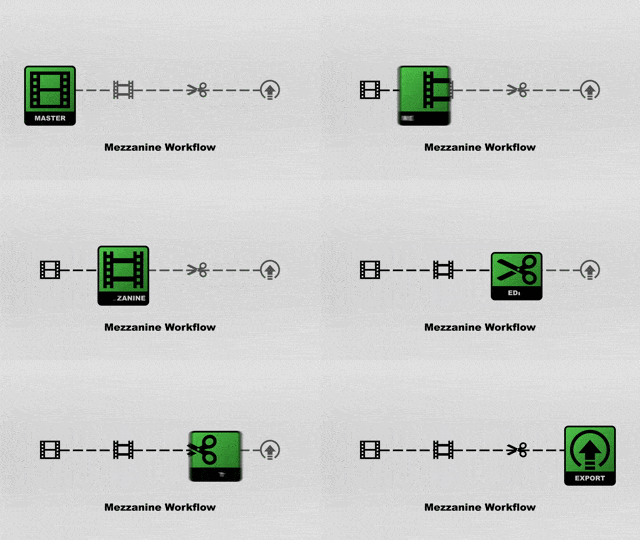
Or, are you creating a high res version that will be your mezzanine file that would work with throughout the creative process?

An animated mezzanine format workflow

A mezzanine format workflow

OK, now on to actually creating edit-worthy media.

This can be challenging for several reasons.

You need to create media that is recognized by and optimized for the editorial platforms you’re cutting on. For Avid Media Composer, this is OPAtom MXF wrapped media. This media is commonly DNxHD, DNxHR and ProRes. What these have in common is that they are non-long GOP formats, which makes them easier for Avid to decode in real time.

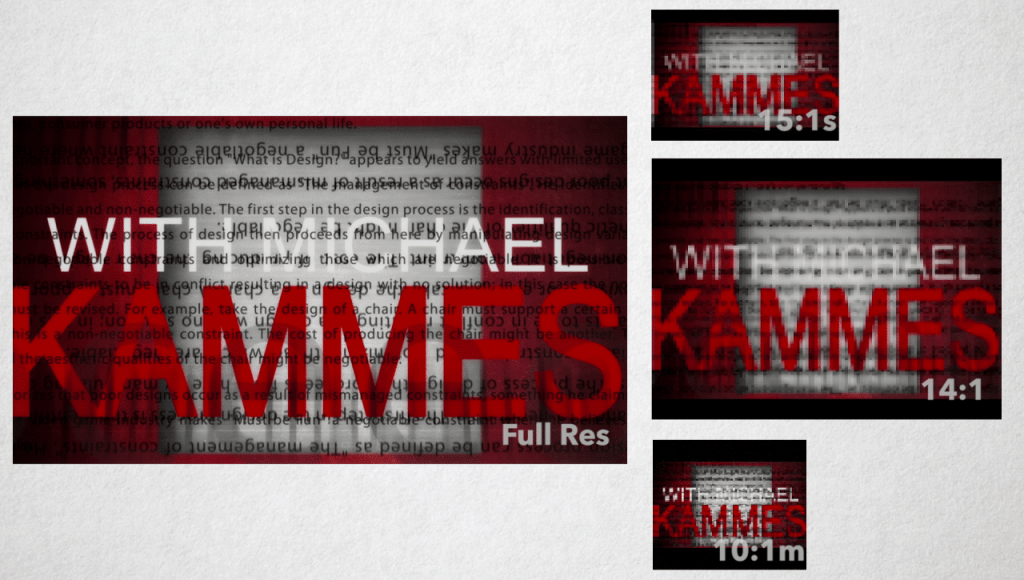
The go-to has been the 20-year-old offline formats of 15:1, 14:1, or 10:1.

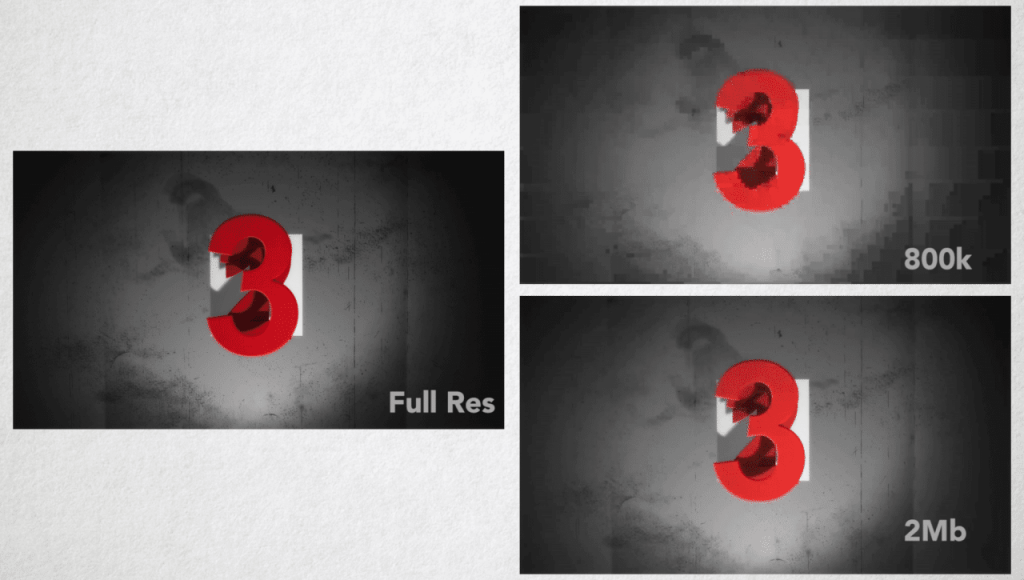
These formats are very small in size, are easy for computers to chomp through, but look like garbage. But if it means not spending money for larger storage or new computers, it’s tolerated. Recently, productions have been moving to the 800k and 2Mb Avid h.264 variants so they can keep larger frame sizes.

You can create this media through the import function, using dynamic media folders, or consolidate and transcode within Media Composer itself.

Adobe Premiere is a bit more forgiving in terms of formats. Premiere, like Avid, will work best with non long GOP formats like DNxHD, DNxHR, and ProRes, but also introduces Cineform, which is a fantastic codec. Premiere Pro also can utilize media wrapped in a QuickTime MOV wrapper, as well as MXF wrappers – both the OPAtom and OP1a flavors. Premiere also has the newer proxy workflow to auto-generate low res media when imported into your Premiere project using Adobe Media Encoder.

Final Cut Pro can create proxies in ingest.

Final Cut Pro X can create proxies during ingest.

Apple Final Cut Pro X, for obvious reasons, it going to work best with ProRes files, but will also play just about anything in an Apple QuickTime MOV wrapper. FCP X will also prompt you to create proxies when you import media to aid in the offline/online process – so just sit back and wait, or let FCP create the proxies in the background.

So, how do we create this media for your NLE du jour? Well, using the NLE you plan on creating with is the obvious choice. What better tool to use than the one you’re editing with? But this solution does have some problems.

First, your edit system is tied up. In multi-editor environments, this can be a logistical challenge when you’re short on systems…and time.

Second, NLE’s are not meant to be transcoders. Can they? Yes. But that’s not where they excel. Due to this, they may be pretty slow at transcoding to create your edit media, and they routinely don’t have as many options as a full-featured transcoder.

This is where dedicated transcoders come into play. However, the usual suspects are fairly limited. Adobe Media Encoder, Apple’s Compressor, Sorenson Squeeze, and EditReady are common tools in an editor’s toolkit. And they are really good at transcoding one standalone file into another. Unfortunately, these tools are usually pretty poor at understanding camera card hierarchies.

What?

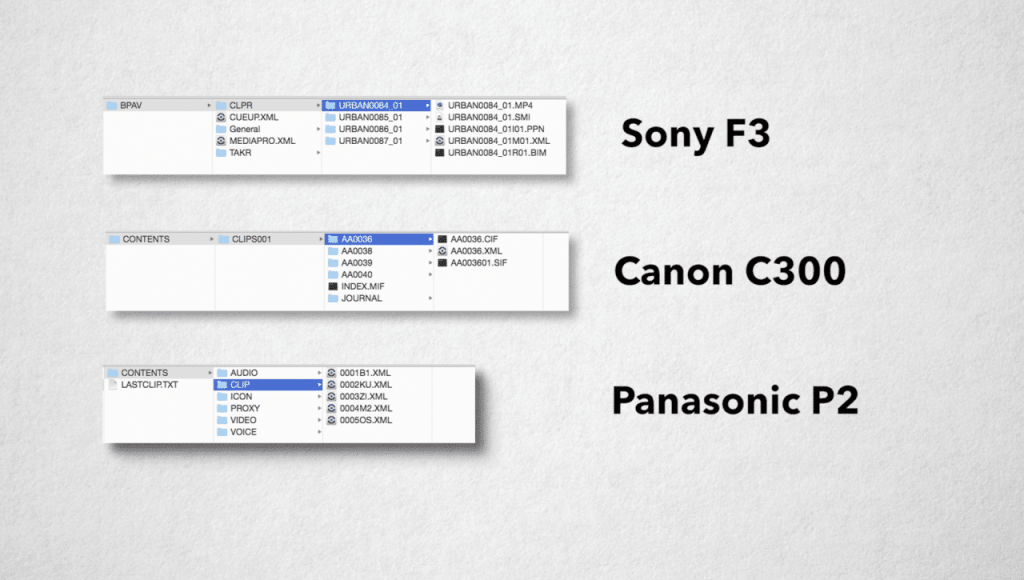
Camera Card Hierarchies. Ever looked at the card structure of the media you shot?

Yeah. Often there will be folders, XML files, thumbnail, and other ancillary data files. Now, this is where your NLE is actually better than your transcoders – often NLEs understand this camera card structure and can pull all of the appropriate metadata and media during a conversion. Often traditional standalone transcoders are good at single files or files with self-contained metadata – like a MOV or AVI file, and sometimes MXF.

If you’re creating media for Avid, this becomes even more difficult, because the formats Avid works with best– OPAtom MXF wrapped media – isn’t commonly supported. And if you need to create ProRes, you better hope you’re using a Mac or have some special way of creating it on a PC.

List of Apple ProRes authorized hardware and software devices

Now, I don’t know about you, but I want the most flexibility with the media I shot, and I don’t want to risk losing metadata because my transcoder doesn’t understand it.

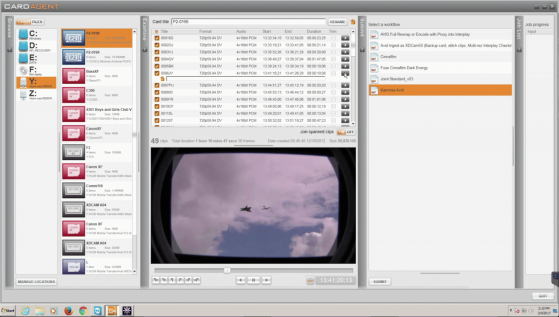
This is where more enterprise tools come into play – Like Root 6’s Content Agent, whose Card Agent application allows for reading camera card hierarchies, creating sub-clips handing of spanned cards and media, renaming, and yes, transcoding to any flavor your need for editorial. You can also map metadata from the card to various metadata fields inside your NLE.

Root 6's Card agent

Card Agent, an add on for Root6’s Content Agent.

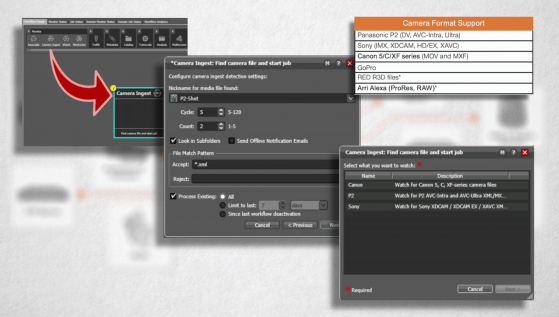
Telestream’s Vantage solution also has Camera Ingest, which also understands several camera card hierarchies and can transcode to just about any format you need.

Telestream Vantage Camera Ingest

Camera Ingest, an add-on for Telestream’s Vantage.

These solutions are also much more facility-based tools – as they can handle transcoding later in post, through intelligent media analysis and automation. They really become the center of your media creation tasks, as opposed to just handling ingest from production.

2. Transcoding for Review & Approve, and Audio

Creative Editorial is not an island. Interaction with other departments needs to not only exist but be as smooth as possible. This is why you’ll need to create media for other departments.

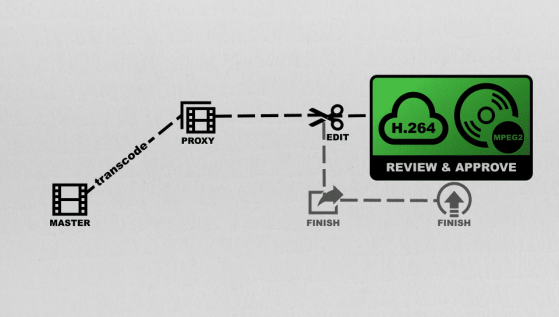
Where Review & Approve lies in the Post Production process

Where Review & Approve lies in the Post Production process

Review and Approve is a common way to solicit feedback from other production folks. Review and Approve can take on many different forms. For some, this is still a DVD, which may or may not have a watermark or a timecode window burn. It can take the form of a web-based interface, where a viewing can add annotations at certain times, and approve or reject cuts. Common tools include Akomi, Frame.IO, Kollaborate, Wipster and several others. You have a bit of liberty here with quality. Most production peoples understand that for sake of expediency, a lower quality file can be used for this type of usage. Veterans are also used to the aforementioned low res proxies used for offline editorial. Also, many viewers are watching on mobile devices with a slower connection, so a lower bitrate h.264 is often acceptable.

Some 3rd party review and approve sites will create mobile device formats these for you, and then playback based on the viewers’ available bandwidth – much like YouTube – but some others need you to generate a file in the format they want. As always, it’s best to check with the end location for the list of their requirements.

The rub here is that this media file needs to come for your NLE. Why? Well, virtually all transcoders don’t understand your Avid, Premiere, or FCP project files, so you HAVE to use the NLE.
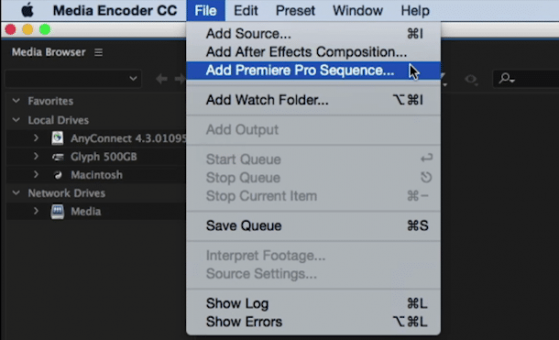
Adobe Media Encoder can link to a premiere Pro Sequence without having the editor export a flattened sequence.

Adobe Media Encoder can link to a premiere Pro Sequence without having the editor export a flattened sequence.

The notable exception is Adobe, whose Adobe Media Encoder understands a Premiere timeline. Just make sure you’re using the same machine or another station that has the same exact plugins, fonts, and of course, every bit of the same media.

Post Audio workflows are pretty baked in. For years it was legacy OMF, or the much more robust AAF format from your NLE, along with embedded audio and handles. Your video would then be a single video track with a specially placed timecode window burn – after all, you don’t want your timecode window burn to block things like should or feet – both of which are needed to determine things like timing for footsteps.

Often, you’ll want to add additional things like watermarks, a 2 pop and tail pop to verify sync, along with the editor’s audio mix for reference. The video format differs from mix facility to mix facility, but most are ProRes or DNx formats. These usually top out at HD as most audio systems can’t handle 4K playback AND all of the horsepower needed for audio sync and playback. For long form projects, or projects where editing and post audio are going on simultaneously, exports may be broken up into sections or reels for ease of manipulation.

3. Transcoding for VFX and Color

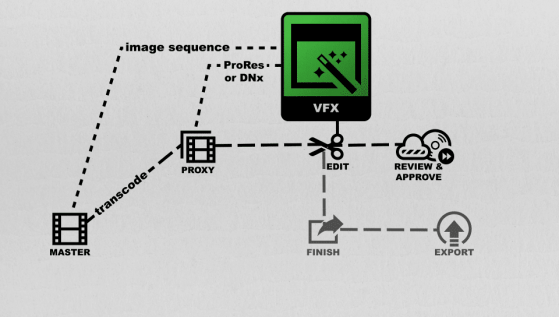
VFX can vary as well. Normally, VFX wants the highest quality version you can generate. Normally, this requires you to go back to the camera originals and generate image sequences – often DPX or Open EXR in nature – so the VFX artists can work with each frame individually. Often, VFX will ask for certain naming conventions for the frames. They’ll also usually request a ProRes or DNx file as a reference, along with timecode window burns with reference metadata so you can match back to the timeline or source media. They may even request an AAF or XML of your NLE timeline. On lower budget projects, a high res ProRes or DNxHD or DNxHR file may be acceptable. As always, ask the VFX house for their deliverables doc – don’t guess.

Where VFX lies in a post production workflow

Where VFX lies in a post production workflow

For color, most colorists prefer to work with the camera originals – which means either they (or you) need to relink back to the original camera files. Depending on your agreement with the colorist, you may need to do the reconform, then handoff the confirmed sequence to the colorist, or they may be responsible for the re-conform. This can be a difficult process – especially if your metadata didn’t make the translation between the production media and edit ready media because you used an ill-equipped transcoder. Other colorists may prefer – and when I say prefer, I mean tolerate – a flattened high res export from your timeline after re-linking back to the camera originals. This export could be a high bitrate ProRes, DNxHD, DNxHR, or Cineform format. Some may even request an image sequence, much like the VFX house, along with any reference DNX or ProRes cuts and an AAF or XML of the sequence.

4. Distribution

Distribution is a very tricky thing. New platforms are emerging, and current distribution outlets are evolving their spec. Thus, you can’t GUESS at what they want. You need to request their deliverable doc. And I assure you, they have one. Let me repeat:

Wherever you’re going, they have a deliverable doc. Ask for it. Now.

For your final export, again, ProRes or DNX are again common formats. This is your master mezzanine file. You now have 1 high res file from which to generate all other subsequent deliverable files. No need to go back to the NLE project file, unless you need a picture change.

This is also where common transcoders can fall short. Generating a DNx or ProRes is relatively easy, but generating a DCP for a theater, or an IMF package for Netflix – those will require non-common tools and someone who knows how to drive them.

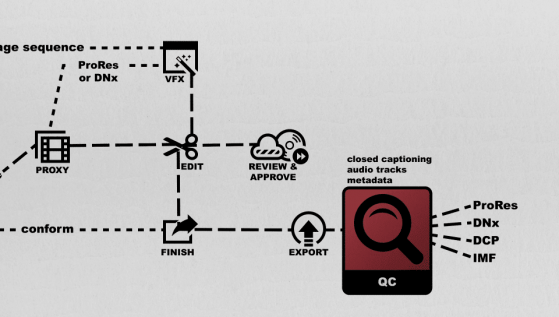
QC can cause issues if the final file isn't exported correctly.

QC can cause issues if the final file isn’t exported correctly.

Often, you’ll need to pass QC. QC isn’t just about visual quality and audio levels. Often, QC is checking things like closed captioning, as well as mapping of certain audio channels, and placement of metadata with the final deliverable file. This is often handled by your transcoder. These “unseen” bits can cause you to fail QC, which can be an expensive and time-consuming process.

This is where the tools I mentioned easier – Root 6’s Content Agent and Telestream’s Vantage also shine. They have granular control over the metadata, codecs, and wrappers so you can ensure your end product not only looks good but also meets the QC standards your end outlet specifies.

5. Tips

Let’s face it, money is always a factor. But don’t forget to look at your TIME. Time is money. And while transcoding using your NLE is free because you own the software and hardware, how many hours are you losing due to prepping for post? How many hours do you lose generating various versions for 3rd parties? How much time do you lose re-encoding because the quality or format wasn’t right? Hell, how much time do you spend just waiting? That time adds up. Your time is worth money.

A basic post-truth is that you can’t increase the visual quality of your footage by transcoding. Simply transcoding your compressed camera footage to a better codec won’t make it look any better – it can only make it easier for your computer to handle. Check out a recent episode to see the finer details of this often-confusing post myth.

Uncompressed, Camera Originals and RAW are all different things – try not to confuse them. Uncompressed anything in today’s day and age is virtually never used because it’s overkill for 99% of the work out there, and the storage requirements and throughput needed are crazy. Plus, transcoding to an uncompressed format when you shot in a compressed format is like the last tip I had – you can’t add quality that isn’t there. Camera originals are pretty much exactly what they sound like and RAW is a codec that the camera will record, and is different from camera manufacturer to camera manufacturer.

Have more transcoding in post concerns other than just these 5 questions? Ask me in the Comments section. Also, please subscribe and share this tech goodness with the rest of your techie friends….they’ll appreciate it (trust me)

Check out the rest of this series and all of the other great learning content at Moviola.com.

Until the next episode: learn more, do more – thanks for watching.

  continue reading

36 epizódok

Artwork
iconMegosztás
 
Manage episode 309677220 series 3037997
A tartalmat a 5 THINGS - Simplifying Film, TV, and Media Technology, 5 THINGS - Simplifying Film, TV, and Media Technology biztosítja. Az összes podcast-tartalmat, beleértve az epizódokat, grafikákat és podcast-leírásokat, közvetlenül a 5 THINGS - Simplifying Film, TV, and Media Technology, 5 THINGS - Simplifying Film, TV, and Media Technology vagy a podcast platform partnere tölti fel és biztosítja. Ha úgy gondolja, hogy valaki az Ön engedélye nélkül használja fel a szerzői joggal védett művét, kövesse az itt leírt folyamatot https://hu.player.fm/legal.

1. Onset and Editorial Transcoding

When does Post actually begin?

Since we’ve moved from celluloid to digital, the answer to this query has quickly moved to production. In fact, over the past 20 years, a new position has emerged – the DIT, or Digital Imaging Technician, as a direct response to the need to coordinate between digital acquisition and subsequent post-production. In fact, the DIT is such an instrumental part of the process, that the DIT is often the liaison that connects production and post together.

Common onset and post transcoding: Blackmagic Resolve, adding a timecode window burn, a watermark, and a LUT.

Adding a watermark, timecode window burn, and LUT inside Blackmagic Resolve

Now, this can vary depending on the size of the production, but the DIT will not only wrangle the metadata and media from the shoot and organize it for post, but they may have added responsibility. This can include syncing 2nd system audio to the camera masters. This may also include adding watermarks to versions for security during the dailies process or putting a LUT on the camera footage. Lastly, the DIT may also create edit ready versions – either high or low res – depending on your workflow. A very common tool is Blackmagic Resolve, but also tools like Editready, Cortex Dailies, or even your NLE.

Now, having the DIT do all of this isn’t a hard and fast rule, as often assistant editors will need to create these after the raw location media gets delivered to post. What will your production do? Often, this comes down to budget. Lower budget? This usually means that the assistants in post are doing a majority of this rather than the folk’s onset.

As for the creation of edit-ready media, this speaks to the workflow your project will utilize. Are you creating low res offline versions for editorial, and then reconforming to the camera originals during your online?

An animated traditional offline/online workflow

A traditional offline/online workflow

Or, are you creating a high res version that will be your mezzanine file that would work with throughout the creative process?

An animated mezzanine format workflow

A mezzanine format workflow

OK, now on to actually creating edit-worthy media.

This can be challenging for several reasons.

You need to create media that is recognized by and optimized for the editorial platforms you’re cutting on. For Avid Media Composer, this is OPAtom MXF wrapped media. This media is commonly DNxHD, DNxHR and ProRes. What these have in common is that they are non-long GOP formats, which makes them easier for Avid to decode in real time.

The go-to has been the 20-year-old offline formats of 15:1, 14:1, or 10:1.

These formats are very small in size, are easy for computers to chomp through, but look like garbage. But if it means not spending money for larger storage or new computers, it’s tolerated. Recently, productions have been moving to the 800k and 2Mb Avid h.264 variants so they can keep larger frame sizes.

You can create this media through the import function, using dynamic media folders, or consolidate and transcode within Media Composer itself.

Adobe Premiere is a bit more forgiving in terms of formats. Premiere, like Avid, will work best with non long GOP formats like DNxHD, DNxHR, and ProRes, but also introduces Cineform, which is a fantastic codec. Premiere Pro also can utilize media wrapped in a QuickTime MOV wrapper, as well as MXF wrappers – both the OPAtom and OP1a flavors. Premiere also has the newer proxy workflow to auto-generate low res media when imported into your Premiere project using Adobe Media Encoder.

Final Cut Pro can create proxies in ingest.

Final Cut Pro X can create proxies during ingest.

Apple Final Cut Pro X, for obvious reasons, it going to work best with ProRes files, but will also play just about anything in an Apple QuickTime MOV wrapper. FCP X will also prompt you to create proxies when you import media to aid in the offline/online process – so just sit back and wait, or let FCP create the proxies in the background.

So, how do we create this media for your NLE du jour? Well, using the NLE you plan on creating with is the obvious choice. What better tool to use than the one you’re editing with? But this solution does have some problems.

First, your edit system is tied up. In multi-editor environments, this can be a logistical challenge when you’re short on systems…and time.

Second, NLE’s are not meant to be transcoders. Can they? Yes. But that’s not where they excel. Due to this, they may be pretty slow at transcoding to create your edit media, and they routinely don’t have as many options as a full-featured transcoder.

This is where dedicated transcoders come into play. However, the usual suspects are fairly limited. Adobe Media Encoder, Apple’s Compressor, Sorenson Squeeze, and EditReady are common tools in an editor’s toolkit. And they are really good at transcoding one standalone file into another. Unfortunately, these tools are usually pretty poor at understanding camera card hierarchies.

What?

Camera Card Hierarchies. Ever looked at the card structure of the media you shot?

Yeah. Often there will be folders, XML files, thumbnail, and other ancillary data files. Now, this is where your NLE is actually better than your transcoders – often NLEs understand this camera card structure and can pull all of the appropriate metadata and media during a conversion. Often traditional standalone transcoders are good at single files or files with self-contained metadata – like a MOV or AVI file, and sometimes MXF.

If you’re creating media for Avid, this becomes even more difficult, because the formats Avid works with best– OPAtom MXF wrapped media – isn’t commonly supported. And if you need to create ProRes, you better hope you’re using a Mac or have some special way of creating it on a PC.

List of Apple ProRes authorized hardware and software devices

Now, I don’t know about you, but I want the most flexibility with the media I shot, and I don’t want to risk losing metadata because my transcoder doesn’t understand it.

This is where more enterprise tools come into play – Like Root 6’s Content Agent, whose Card Agent application allows for reading camera card hierarchies, creating sub-clips handing of spanned cards and media, renaming, and yes, transcoding to any flavor your need for editorial. You can also map metadata from the card to various metadata fields inside your NLE.

Root 6's Card agent

Card Agent, an add on for Root6’s Content Agent.

Telestream’s Vantage solution also has Camera Ingest, which also understands several camera card hierarchies and can transcode to just about any format you need.

Telestream Vantage Camera Ingest

Camera Ingest, an add-on for Telestream’s Vantage.

These solutions are also much more facility-based tools – as they can handle transcoding later in post, through intelligent media analysis and automation. They really become the center of your media creation tasks, as opposed to just handling ingest from production.

2. Transcoding for Review & Approve, and Audio

Creative Editorial is not an island. Interaction with other departments needs to not only exist but be as smooth as possible. This is why you’ll need to create media for other departments.

Where Review & Approve lies in the Post Production process

Where Review & Approve lies in the Post Production process

Review and Approve is a common way to solicit feedback from other production folks. Review and Approve can take on many different forms. For some, this is still a DVD, which may or may not have a watermark or a timecode window burn. It can take the form of a web-based interface, where a viewing can add annotations at certain times, and approve or reject cuts. Common tools include Akomi, Frame.IO, Kollaborate, Wipster and several others. You have a bit of liberty here with quality. Most production peoples understand that for sake of expediency, a lower quality file can be used for this type of usage. Veterans are also used to the aforementioned low res proxies used for offline editorial. Also, many viewers are watching on mobile devices with a slower connection, so a lower bitrate h.264 is often acceptable.

Some 3rd party review and approve sites will create mobile device formats these for you, and then playback based on the viewers’ available bandwidth – much like YouTube – but some others need you to generate a file in the format they want. As always, it’s best to check with the end location for the list of their requirements.

The rub here is that this media file needs to come for your NLE. Why? Well, virtually all transcoders don’t understand your Avid, Premiere, or FCP project files, so you HAVE to use the NLE.

Adobe Media Encoder can link to a premiere Pro Sequence without having the editor export a flattened sequence.

Adobe Media Encoder can link to a premiere Pro Sequence without having the editor export a flattened sequence.

The notable exception is Adobe, whose Adobe Media Encoder understands a Premiere timeline. Just make sure you’re using the same machine or another station that has the same exact plugins, fonts, and of course, every bit of the same media.

Post Audio workflows are pretty baked in. For years it was legacy OMF, or the much more robust AAF format from your NLE, along with embedded audio and handles. Your video would then be a single video track with a specially placed timecode window burn – after all, you don’t want your timecode window burn to block things like should or feet – both of which are needed to determine things like timing for footsteps.

Often, you’ll want to add additional things like watermarks, a 2 pop and tail pop to verify sync, along with the editor’s audio mix for reference. The video format differs from mix facility to mix facility, but most are ProRes or DNx formats. These usually top out at HD as most audio systems can’t handle 4K playback AND all of the horsepower needed for audio sync and playback. For long form projects, or projects where editing and post audio are going on simultaneously, exports may be broken up into sections or reels for ease of manipulation.

3. Transcoding for VFX and Color

VFX can vary as well. Normally, VFX wants the highest quality version you can generate. Normally, this requires you to go back to the camera originals and generate image sequences – often DPX or Open EXR in nature – so the VFX artists can work with each frame individually. Often, VFX will ask for certain naming conventions for the frames. They’ll also usually request a ProRes or DNx file as a reference, along with timecode window burns with reference metadata so you can match back to the timeline or source media. They may even request an AAF or XML of your NLE timeline. On lower budget projects, a high res ProRes or DNxHD or DNxHR file may be acceptable. As always, ask the VFX house for their deliverables doc – don’t guess.

Where VFX lies in a post production workflow

Where VFX lies in a post production workflow

For color, most colorists prefer to work with the camera originals – which means either they (or you) need to relink back to the original camera files. Depending on your agreement with the colorist, you may need to do the reconform, then handoff the confirmed sequence to the colorist, or they may be responsible for the re-conform. This can be a difficult process – especially if your metadata didn’t make the translation between the production media and edit ready media because you used an ill-equipped transcoder. Other colorists may prefer – and when I say prefer, I mean tolerate – a flattened high res export from your timeline after re-linking back to the camera originals. This export could be a high bitrate ProRes, DNxHD, DNxHR, or Cineform format. Some may even request an image sequence, much like the VFX house, along with any reference DNX or ProRes cuts and an AAF or XML of the sequence.

4. Distribution

Distribution is a very tricky thing. New platforms are emerging, and current distribution outlets are evolving their spec. Thus, you can’t GUESS at what they want. You need to request their deliverable doc. And I assure you, they have one. Let me repeat:

Wherever you’re going, they have a deliverable doc. Ask for it. Now.

For your final export, again, ProRes or DNX are again common formats. This is your master mezzanine file. You now have 1 high res file from which to generate all other subsequent deliverable files. No need to go back to the NLE project file, unless you need a picture change.

This is also where common transcoders can fall short. Generating a DNx or ProRes is relatively easy, but generating a DCP for a theater, or an IMF package for Netflix – those will require non-common tools and someone who knows how to drive them.

QC can cause issues if the final file isn't exported correctly.

QC can cause issues if the final file isn’t exported correctly.

Often, you’ll need to pass QC. QC isn’t just about visual quality and audio levels. Often, QC is checking things like closed captioning, as well as mapping of certain audio channels, and placement of metadata with the final deliverable file. This is often handled by your transcoder. These “unseen” bits can cause you to fail QC, which can be an expensive and time-consuming process.

This is where the tools I mentioned easier – Root 6’s Content Agent and Telestream’s Vantage also shine. They have granular control over the metadata, codecs, and wrappers so you can ensure your end product not only looks good but also meets the QC standards your end outlet specifies.

5. Tips

Let’s face it, money is always a factor. But don’t forget to look at your TIME. Time is money. And while transcoding using your NLE is free because you own the software and hardware, how many hours are you losing due to prepping for post? How many hours do you lose generating various versions for 3rd parties? How much time do you lose re-encoding because the quality or format wasn’t right? Hell, how much time do you spend just waiting? That time adds up. Your time is worth money.

A basic post-truth is that you can’t increase the visual quality of your footage by transcoding. Simply transcoding your compressed camera footage to a better codec won’t make it look any better – it can only make it easier for your computer to handle. Check out a recent episode to see the finer details of this often-confusing post myth.

Uncompressed, Camera Originals and RAW are all different things – try not to confuse them. Uncompressed anything in today’s day and age is virtually never used because it’s overkill for 99% of the work out there, and the storage requirements and throughput needed are crazy. Plus, transcoding to an uncompressed format when you shot in a compressed format is like the last tip I had – you can’t add quality that isn’t there. Camera originals are pretty much exactly what they sound like and RAW is a codec that the camera will record, and is different from camera manufacturer to camera manufacturer.

Have more transcoding in post concerns other than just these 5 questions? Ask me in the Comments section. Also, please subscribe and share this tech goodness with the rest of your techie friends….they’ll appreciate it (trust me)

Check out the rest of this series and all of the other great learning content at Moviola.com.

Until the next episode: learn more, do more – thanks for watching.

  continue reading

36 epizódok

Tüm bölümler

×
 
Loading …

Üdvözlünk a Player FM-nél!

A Player FM lejátszó az internetet böngészi a kiváló minőségű podcastok után, hogy ön élvezhesse azokat. Ez a legjobb podcast-alkalmazás, Androidon, iPhone-on és a weben is működik. Jelentkezzen be az feliratkozások szinkronizálásához az eszközök között.


Gyors referencia kézikönyv